 Photography has grown extremely popular, the advent of digital cameras that do not require tedious film loading and processing is a major reason for this. Cameras have become more advanced, price ranges have widened and auto focusing capabilities have significantly improved. With all this ease of taking pictures, camera users have begun to believe one simple rule that ‘ …. Auto made is best.’ All you do is to turn on the camera and point it at the subject, press the shutter button and the camera does the magic.
Today’s photographer does not care how the camera does the job, he or she is just thrilled with the sharp and nicely lit image delivered effortlessly. There was a time when even the most amateur camera user, had to have a fairly thorough knowledge about a few camera settings. The aperture and shutter speed were of prime importance, they still are. It is just that the modern day cameras can set these important functions on their own, no need of manual intervention is called for.
The type of photograph that you get with an Auto mode setup is quite standard, the beauty is generally in the subject and camera angle. But what if you wanted to add some creativity to your photography. Taking control of the Aperture and Shutter Speed functions on the camera, can open the doors to some awesome results. We explain these 2 important functions without getting too technical. In most cameras, control over these and many other functions begins when, the camera is set in the Manual mode. This function would be shown as ‘M’ and is present on almost every DSLR and Compact Digital Camera.
Aperture: The aperture is a small hole that influences what your camera ‘sees’ through the lens. It is generally denoted by the alphabet ‘f’ and many of you might know it as the ‘F-stop’. As a first step, you will need to learn how to set up the aperture for your camera. One way to learn how to setup the aperture in your camera, would be to open the manual and go through the contents. The internet today has made things a lot easier, you could do a quick search on google and grab the details in little time. Specify your camera brand and model number along with a short term like, ‘ …. Nikon D5300 set up aperture manually …..’ Once you know how to set the aperture, move on and continue reading.
 So what function does the aperture play in a camera. As explained above, the aperture defines a ‘hole’ and resides behind the camera lens. The smaller the hole, the lower the light that reaches the image captured inside. Interestingly the larger the ‘f number’ the smaller the hole, the smaller the number the bigger the hole. What this implies is that, an f16 setup gives you a smaller ‘aperture hole’ as compared to an f8 setup.
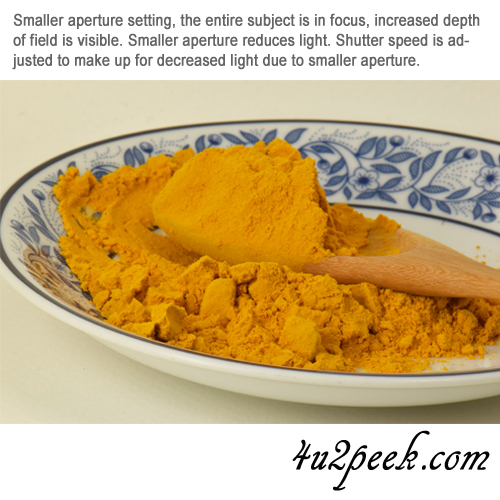
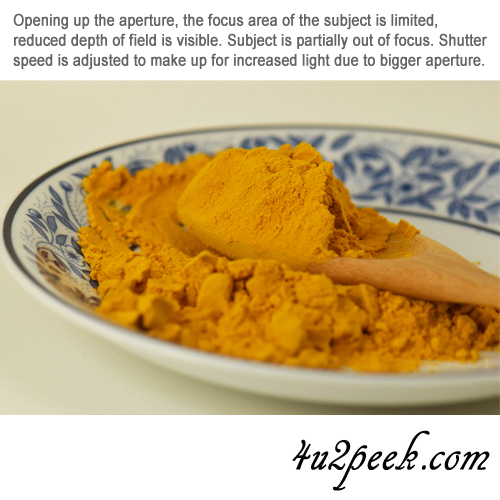
There is one more important effect controlled by the aperture in a camera, this is referred to as the ‘depth of field’. Assume that you are standing at point A and pointing your camera towards the subject located at point B. There is a distance in front of point B and also behind point B. To put in very simple terms, the ‘depth of field’ defines, just how much of the portion around (front and behind) the subject at point B, comes under focus. A bigger f number which implies a smaller aperture (hole) size, increases the depth of field and vice versa.
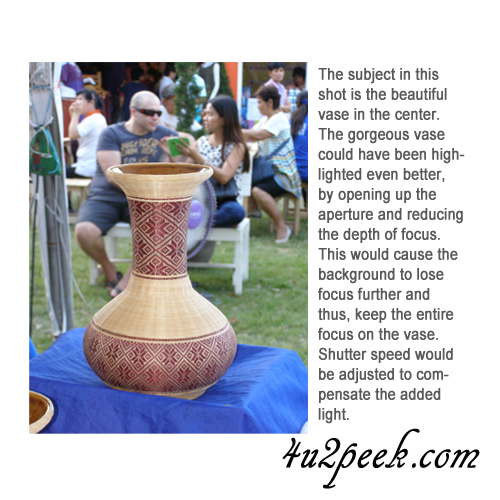
So where does this depth of field factor become applicable or useful. Let us presume that you have a garden with beautiful flowers. You take a general photograph and most of the plants, leaves, branches etc would come into focus. There is nothing wrong with such a picture, it would look pretty and gain a lot of admirers. Now what, if you wanted to highlight a single large rose on a plant. You wish that this rose would be the main attraction in the photograph, you would want to downplay the appearance of the surrounding details. This is when a total control of the Aperture Function on your camera can come in handy.
To summarize what we have just learnt about the aperture, here is a quick recap. In most cameras, you can gain control over the Aperture function by setting the camera in ‘M’ or ‘Manual’ mode. The aperture defines the size of a hole, it lies behind the lens. A smaller aperture number implies a larger hole size and vice versa. Besides controlling the amount of light that enters the camera through the lens, the aperture also defines the depth of field in the image.
Shutter Speed: The term shutter speed is self-explanatory but, in terms of photography a few more details become relevant. Most of the shutter speeds used to shoot day time or flash based photographs, is defined in terms of a fraction of a second. The shutter speed defines, just how long the light will be allowed to pass through the aperture (hole). The light has to obviously travel through the lens, the aperture lies behind the lens. We now know enough about the aperture and shutter speed to conclude that, the amount of light that travels into the camera is controlled by both, the aperture and shutter speed.
 The Manual mode function on your camera should allow you to control the shutter speed. Learn how to set up the shutter speed for your specific camera brand and model. The hints provided in the Aperture setup above, should help you find the information more easily.
A shutter speed setting of 1/60 refers to a speed that is one sixtieth of a second, a speed of 1 implies a whole second, 1/8 refers to one eight of a second. Since 1/8 is bigger than 1/60, a shutter speed of 1/8 allows more light in as compared to a speed of 1/60. More light does not always imply a better and brighter photograph. While insufficient light can darken a picture and subdue details, too much light can wash out colors and give the picture a white and lifeless look.
In still photography shutter speed does one more important thing, it is able to freeze motion. Let us presume that you are taking a photograph of a man running. Using a slower than required shutter speed, will cause the image of the man to appear blurred. On the other hand, a slower shutter speed could be fine if the object being photographed was stationery.
Aperture + Shutter Speed:
Since both the aperture and shutter speed influence the amount of light that is permitted into the camera, the settings will need to be decided based on each other. So if you wished to take a photograph with a small depth of field, increase the size of the aperture (lower aperture number) and cut down the shutter speed. On the other hand when taking pictures of moving subjects, get the shutter speed right and then adjust the aperture accordingly. So what then is the ‘best’ combination of aperture and shutter speed. The answer is really easy, there is nothing like a perfect or best setting. Practice and try various settings, keep trying and work to achieve the image that you planned to create.
Quick Tips: As you keep dabbling with options available through the Manual Mode in your camera, switch to the Auto mode when you need quick images for whatever reason. Even expert photographers working in the Manual Mode, take many and sometimes dozens of shots, for each picture. They then pick the best one to complete their portfolio or collection. Most cameras today offer options for manual and auto modes, so you might need to spend money on a new one.